I've just spent what seems like days trying to get my spreadsheet showing the cost of the parts that are needed to complete the scooter. Of course it's not complete, things can only get worse. I started in Excel because I had used it before and so thought it would save time. Having set up the sheet I filled in what I knew and even produced column totals. I was now ready to my blog. Some hope. At first I just copied the relevant area and pasted it into the new blog. Great the sheet appeared and made sense. Then I noticed a little prompt in red at the bottom of the table saying something to the effect "file not saved due to formatting errors". I then tried inserting an image via the tool bar having first placed a copy on the desktop. Something about not being compatible.
To save you having to read a blow by blow account of the last two days I will summarise. I tried Blogger help but quickly gave it up once I found a proposed solution involving entering code. Why cant Google realise that there is a need to include spreadsheets. I then looked at Gmail Documents. Tim had told me previously I should use Google but I didn't want to learn a new system. OK so he was right. It appears that if I copy the address from my Gmail Spreadsheet and past it into the Blogger Link it works. When I say works it shows the spreadsheet if you click on the appropriate words - "Missing Parts". What I don't know is if it is secure i.e. followers can't modify the data. I think I have set it to view only in Gmail I will have to wait for feedback. Another thought, do you have to have a Gmail account to access the data?
You might ask why do I want to do this? I think it's important to record just how much this rebuild is costing. I think it will show that it is best to buy a complete scooter rather than one only part complete as I have. That way you only have to replace what's necessary and I still don't know if I can get all the missing bits.
Missing Parts click here to see the spreadsheet
Sunday, 15 August 2010

Thursday, 12 August 2010
THE TORSION BAR
I have been discovering that the scooter literally revolves round a part called the "TORSION BAR". The scooter's rear suspension relies on this part and it is necessary to know about it if you want to remove the engine unit. Since I need to remove the engine currently fitted in the frame I need to know about it. I have met these devices before in the Renault 4 and the Morris Marina so I know that you have to approach them with caution. I had read at somewhere that it was necessary to unload the torsion bar if you didn't want to damage the roller bearing cage whilst removing the scooter engine. How am I going to do that?
My first move was to log onto the Lambretta Club site. It must be me but it took me ages to get the hang of the forums. I have to say I'm always a bit frightened of using forums. The other users seem so "nurdish". They always seem to take delight in slagging off anyone who doesn't speak the language or follow the obscure rules. Eventually I found a section on pre 57 scooters. Even more "eventually" I found a reference (a thread, in forum speak) to the torsion bar tool on page five of eleven. It contained fourteen entries discussing where to get a tool and a little bit about the method of using it or making do with an alternative. Not a lot of use, back to the post board index (I'm getting the hang of the terms now). After an abortive excursion into "Anoraks Corner" I returned to the pre-57 section. With a bit more experience I found a reference to "the torsion bar". This was more like it, it actually had members talking of how to remove it. It was time to join in so I prepared my first post and waited for the reprimands. To my surprise I got a couple of useful reply's pointing me to other sites, including the French Lambretta Club on how to remove the engine. Now I wish I'd concentrated more during French lessons!
About this time I received my copy of The Lambretta Service Guide and Handbook on a CD which I had bought on Ebay. It turned out to contain some very useful information including a description of using the tool to unload the torsion bar ready to remove the engine. I have read and re-read the instructions in an attempt to understand how the tool works. The reinstatement of the connection between the engine and the link is fine and I can see what they are talking about. I even think I could make the tool to do the job. The disconnection is another matter. Remembering that the connections are under load from the torsion bar I can't see, from the description, how to avoid the point where link is broken under the full force of the torsion bar. I think that it needs to be released in a controlled manner.
So, where have I got to. I really like the idea of making a tool if I can find how to use it and what it looks like. I have left requests on the LCGB site requesting any pictures of the original tool. If that fails I may have to resort to a bodge and use a large clamp, see link :- (http://www.forums.ilambretta.com/viewtopic.php?f=4&t=8035)
to enable me to slowly release the load once I have removed the link pin. It would work for refitting the pin but not as elegant as the correct tool!
I'm still a bit confused by the LCGB forum site but this is how I think it works. There a number of sections ( FAQ, Lambretta Help, Lambrett Gerneral, LCGB Members area, Forum Help etc) in each of which there are a series of topics e.g. Anoraks Corner, Tuning Kits, Pre 57, UK Rallies and Events etc. Some of these contain many topics: for Series 1,2and 3, 48,000 posts spread over 6000 topics.
In the case of the "Pre 57" section there are some 260 topics with 1200 posts. These are covered on eleven pages so it very easy to read something useful and then forget where it was. I believe it is possible to bookmark a post but that's for another day. There is obviously a lot going on and for now it's just a case of trawling through a lot of information until you find what you need.
My first move was to log onto the Lambretta Club site. It must be me but it took me ages to get the hang of the forums. I have to say I'm always a bit frightened of using forums. The other users seem so "nurdish". They always seem to take delight in slagging off anyone who doesn't speak the language or follow the obscure rules. Eventually I found a section on pre 57 scooters. Even more "eventually" I found a reference (a thread, in forum speak) to the torsion bar tool on page five of eleven. It contained fourteen entries discussing where to get a tool and a little bit about the method of using it or making do with an alternative. Not a lot of use, back to the post board index (I'm getting the hang of the terms now). After an abortive excursion into "Anoraks Corner" I returned to the pre-57 section. With a bit more experience I found a reference to "the torsion bar". This was more like it, it actually had members talking of how to remove it. It was time to join in so I prepared my first post and waited for the reprimands. To my surprise I got a couple of useful reply's pointing me to other sites, including the French Lambretta Club on how to remove the engine. Now I wish I'd concentrated more during French lessons!
 | ||
| Item 15 - Torsion Bar |
So, where have I got to. I really like the idea of making a tool if I can find how to use it and what it looks like. I have left requests on the LCGB site requesting any pictures of the original tool. If that fails I may have to resort to a bodge and use a large clamp, see link :- (http://www.forums.ilambretta.com/viewtopic.php?f=4&t=8035)
to enable me to slowly release the load once I have removed the link pin. It would work for refitting the pin but not as elegant as the correct tool!
I'm still a bit confused by the LCGB forum site but this is how I think it works. There a number of sections ( FAQ, Lambretta Help, Lambrett Gerneral, LCGB Members area, Forum Help etc) in each of which there are a series of topics e.g. Anoraks Corner, Tuning Kits, Pre 57, UK Rallies and Events etc. Some of these contain many topics: for Series 1,2and 3, 48,000 posts spread over 6000 topics.
In the case of the "Pre 57" section there are some 260 topics with 1200 posts. These are covered on eleven pages so it very easy to read something useful and then forget where it was. I believe it is possible to bookmark a post but that's for another day. There is obviously a lot going on and for now it's just a case of trawling through a lot of information until you find what you need.
Wednesday, 4 August 2010
TAKING A STAND
After my trip to Scooter Surgery I have started thinking about removing the existing engine from the frame. I will need to release the tension in the torsion bar which provides the suspension for the engine unit. This will involve some force and I quickly realised that the existing scooter stand didn't provide a really good working base. What I needed was a working stand.
 Looking at what was available I found the ideal material, a length of 50mm x 50mm box section tube. I just needed to make up a base and attach something to pick up the stand mounting point on the frame, easy. I took the measurements from the frame where the stand fits and set to work. Things went well and I enjoyed the cutting and welding, but I can never understand why any critical welds always turn out to look the worst. Just as I'm finishing the job my welding picks up and they look like real welds, still one thing for sure, it won't fall to bits.
In order to remove the stand I had to lift the rear wheel higher off the table. This meant that the only thing keeping the scooter upright was the clamp on the front wheel, need for caution I realised. Using a trolley jack and lots of packing all went well but I have to admit that I was relieved to see the scooter still standing the next morning. I forgot to mention that I hadn't removed the stand when I took my dimensions for the mounting bracket. These were taken form what I could see and what I thought was the situation. Bad move. The removal of the stand itself was easy but it was then that I discovered that there were spacers fitted between the frame and the stand itself. My mounting bracket was too narrow - great!
 The only solution was to cut it off and make a new one. A good moment to see just what my weld were like. I have to say I was pleased with them and they confirmed my earlier feelings. This time I made and fitted the bracket to the scooter before welding it to the base so I knew it would fit. It was a good job because I had overlooked the mount for the kick stand return spring. A bit of "relief" to make the bracket fit and it was ready to weld to the base.
I was so pleased (relieved) that it worked I decided to guild the lily and fit three feet to the base. I had two feet in the garage but had to pinch the third from June's working table upstairs, so far she hasn't noticed. I love drilling 32mm diameter holes in 3mm steel. I think I must be hooked on the smell of burning oil and smoke. After a quick fitting I was ready to give it a coat of paint just to tidy things up and to mask some of my poorer welds.
 With the working stand fitted and the jack removed I was pleased to find that the whole assembly was much more stable. I now wont have to keep thinking about the possibility of the lot ending up on the floor, not a good thought.
If your wondering what the bolt at the end of the leg is for, it's an accident. The threaded hole was already there in the tube. I left it as it might provide a tie down point if I need it.
Now to investigate how to remove the engine unit.

In order to remove the stand I had to lift the rear wheel higher off the table. This meant that the only thing keeping the scooter upright was the clamp on the front wheel, need for caution I realised. Using a trolley jack and lots of packing all went well but I have to admit that I was relieved to see the scooter still standing the next morning. I forgot to mention that I hadn't removed the stand when I took my dimensions for the mounting bracket. These were taken form what I could see and what I thought was the situation. Bad move. The removal of the stand itself was easy but it was then that I discovered that there were spacers fitted between the frame and the stand itself. My mounting bracket was too narrow - great!
 The only solution was to cut it off and make a new one. A good moment to see just what my weld were like. I have to say I was pleased with them and they confirmed my earlier feelings. This time I made and fitted the bracket to the scooter before welding it to the base so I knew it would fit. It was a good job because I had overlooked the mount for the kick stand return spring. A bit of "relief" to make the bracket fit and it was ready to weld to the base.
 I was so pleased (relieved) that it worked I decided to guild the lily and fit three feet to the base. I had two feet in the garage but had to pinch the third from June's working table upstairs, so far she hasn't noticed. I love drilling 32mm diameter holes in 3mm steel. I think I must be hooked on the smell of burning oil and smoke. After a quick fitting I was ready to give it a coat of paint just to tidy things up and to mask some of my poorer welds.

If your wondering what the bolt at the end of the leg is for, it's an accident. The threaded hole was already there in the tube. I left it as it might provide a tie down point if I need it.
Now to investigate how to remove the engine unit.
Friday, 30 July 2010
COMMITTED
I've done it. I've taken the original engine for rebuild. This is an important milestone in the project because it represents a big capital investment and one I'm unlikely to get back in the near future.
Having exchanged Emails with Scooter Surgery over the past few days it was finally agreed that I should take the engine to them on Tuesday 27th July. I had investigated the route to Scooter Surgery, it's in Hammersmith just off Shepherds Bush Green. From their web site it looked a difficult place to park but Maude had said that it was possible to park right outside. She should know. I tried to look up the site on Google Maps just to be sure but you can't actually view the shop/railway arch in Street View, only what I assumed to be the access road as a turning off Trussley Road.
June had agreed to come with me and so with the engine loaded into the back of her car we set off at 1030 hrs. The traffic was reasonable and with the help of TomTom we arrived and hour later. Just as Google had shown we found the narrow access road to Scooter Surgery, not helped by the fact that there was no signs to confirm we were right. No alternative but to commit to the narrow road between the railway arches and a brick wall. It really was quite narrow, I guess you can get a Transit van down but not much more. We could see what we thought were Scooters in the distance so drove on in the hope of eventually finding arch 219. Part way down I said I hoped that you could get out at the far end because otherwise it was going to be a long reverse.
We parked up behind a number of scooters and I went of investigate. From the number of scooters I had expected to find a crowd of customers but in fact there transpired to be only one and he had come on a Ducattie. Once inside the shop (is that what you call somewhere stuffed with all things scooter?) I asked the woman, I guessed she was Maude if I could speak to Paul. This confused her and she asked if I had got the right place. After a moment of embarrassment I realised I should have said Patrick (AKA Patch). This cleared up Maude pointed to a guy on the phone, apparently he was speaking to a customer in Australia. Why not? Whilst waiting I chatted to the "customer" who said he had a number of scooters and had used Patrick for many years and would not consider going to anyone else, "he's not cheap but it does get it right". He could have been a "plant" but I suspect not.
The best way to describe the shop is "organised chaos". There were parts hanging from the ceiling, parts on shelves, parts beyond the counter and parts in what was more like a traditional stores area. There were part built scooters and on a mezzanine floor to one side there were even more complete scooters. This would not work without someone knowing their way round Lambrettas. I soon became obvious that they were Patrick and Maude. Perhaps I could now understand why their web site didn't have part numbers. You told them what you needed and they produced it by just knowing what was required.
Patrick eventually came off the phone and we introduced ourselves. He had the engine out of the boot in a moment and was examining it on the ground. He said he the corrosion on the casing was possibly due to it being in water and he didn't like the look of the crank and yes he could see no reason why the engine couldn't be rebuilt. That was good news even if I could hear the disclaimer - for money. He took the engine back to the shop to book it in to ensure it didn't get lost in all the other jobs he was doing. I asked him about availability of parts like the rear light and head light. Not a problem he stocks them. One thing he does not have is any documentation for sale, apparently its never been reprinted. I asked if I could take some pictures of his LD because I didn't know what the details should look like. Patrick removed the side panels so I could get better access. I have to say he really does use his LD on a daily basis. We later talked about how to buy a Lambretta and he said it mostly down to luck as to what you get. He has known people spending a lot on a model that looked great only to have to spend another £2000 to get it right. On the other hand he has seen scooters bought for few hundred pounds that after a service worked perfectly.
We started talking about the engine in the scooter at the moment. Patrick said he would like to see it at some point because there were anomalies with the gear change mechanism. Apparently it's a MK3 engine but with teleflex drive for the gear change. When I told him I had understood from Mark it was four speed that only confused him still further. Lambretta did make a 4 speed box but it was never put into production he told me. I must have miss heard Mark, if it is four speed it must be something of a rarity! In order to explain the subtleties of the different gear change mechanisms Patrick took me back down the road to his workshop. This is in another arch, perhaps ten arches away. Having seen how crowded the shop was I have to admit I was wondering where he did his repairs, now I know.
Patrick had not explained what he was going to show me and I had just followed him to this new arch so when he opened the door I had no idea what to expect.
The first thing I saw was a scooter in the doorway but I couldn't see much further into the dark interior until Patrick, who had vanished into the gloom, had switched on a light. Wow-ee, what else could I say? The entire area seemed to be covered in scooters in various states. I stood to one side whilst Patrick wheeled out into the road at least eight scooters ranging from an L1 to a Mk3. and this only cleared the access to the bench. There were three scooters on table lifts with others between them.
There were others to the left of the main walkway that had been recently uncovered. I couldn't help wondering who these scooters belonged to. Surely if they were customers they would be outside chasing him for their completion. I didn't ask because Patrick was already showing me the various bits associated with the Teleflex and MK2 gear change. He was part way through rebuilding a box , I think I understand the differences now.
 We then talked about the cost of my rebuild. Patrick had already said that from my photographs he estimated a cost of £1000 and to that I would need to add the cost of changing the crankshaft. Total cost, £1200 (perhaps). I heard myself say, "Go ahead", I was COMMITTED. Perhaps the daftest thing I said was "I'm not in a hurry". I may have to deny this later. As we were leaving the workshop Patrick pointed out some of the engines waiting rebuild. Have I done the right thing? Will I ever get my engine back? We walked back to the shop where Maude was talking to June. I think she's seen abandoned wives before and knows keeping the wives happy is the way to get the husbands to spend their money. I took one last photograph of my engine all alone in the shop doorway and felt a bit sad abandoning it. I wonder when I shall see it again?
After the long reverse out the drive home was easy. Looking back on the day I feel it was what I enjoy about projects, the experiences and characters along the way. Scooter Surgery couldn't have been more welcoming I'm glad that I have decide to go ahead with them.
 |
| Arch 219 at the end |
June had agreed to come with me and so with the engine loaded into the back of her car we set off at 1030 hrs. The traffic was reasonable and with the help of TomTom we arrived and hour later. Just as Google had shown we found the narrow access road to Scooter Surgery, not helped by the fact that there was no signs to confirm we were right. No alternative but to commit to the narrow road between the railway arches and a brick wall. It really was quite narrow, I guess you can get a Transit van down but not much more. We could see what we thought were Scooters in the distance so drove on in the hope of eventually finding arch 219. Part way down I said I hoped that you could get out at the far end because otherwise it was going to be a long reverse.
 |
| Mable and Patrick |
The best way to describe the shop is "organised chaos". There were parts hanging from the ceiling, parts on shelves, parts beyond the counter and parts in what was more like a traditional stores area. There were part built scooters and on a mezzanine floor to one side there were even more complete scooters. This would not work without someone knowing their way round Lambrettas. I soon became obvious that they were Patrick and Maude. Perhaps I could now understand why their web site didn't have part numbers. You told them what you needed and they produced it by just knowing what was required.
 |
| Patrick with his LD |
 |
| The Workshop Arch |
Patrick had not explained what he was going to show me and I had just followed him to this new arch so when he opened the door I had no idea what to expect.
 |
| Three on lifts |
 |
| The cleared walk way |

After the long reverse out the drive home was easy. Looking back on the day I feel it was what I enjoy about projects, the experiences and characters along the way. Scooter Surgery couldn't have been more welcoming I'm glad that I have decide to go ahead with them.
Friday, 23 July 2010
THE PROJECT GETS A LIFT
The motorbike lift table has arrived. I'm really excited about it as it represents a further commitment to the project. I decided at the outset that I'm too old to be laying on the floor sorting things out. This piece of kit will save me having to do that and at the end of the project I can always put it on Ebay to recoup some of the expense.
 True to the suppliers word it arrived at 1230hrs and the driver dragged into the project office, it was really heavy. Once the driver had left I couldn't resist the temptation to unpack my new acquisition. I was pleased to find that it was just as well made as it appeared on the web site and all for £235 plus delivery. It's very red and there bits that look as though they have been cut using a cold chisel but in general the quality is good. I think it's great value for money. I raised the table to its full height with no difficulty and lowered it again, it's going to be great. The removable plate at the end provides a ramp to enable the bike to be easily pushed onto the table.
 I decided to fit a length of conveyor belting that I had left over from a previous job. I thought this would make a nice surface to work from. I cut holes in the belting to enable the front wheel clamp arrangement to be fitted. All was ready for the first attempt at putting the scooter onto the table. The first thing I encountered was that the stand "just" catches the point where the ramp meets the end of the table. It's not a real problem and can be easily overcome by putting a block under the end of the ramp plate. The result was that there is now a small loss of red paint on the ramp, still plenty left. With the scooter on the table and on its stand I was able to assess the situation. I certainly needs the front wheel clamp. Without this there is a risk that the scooter could come off its stand. I'll have to look into this because I don't think the stand goes overcentre enough for it to be secure. With the front wheel clamped things are much more stable and I was prepared to lift the table. What a joy to have the engine at a working height.
So there we have it, no progress on the scooter but it's progress on the project.
 True to the suppliers word it arrived at 1230hrs and the driver dragged into the project office, it was really heavy. Once the driver had left I couldn't resist the temptation to unpack my new acquisition. I was pleased to find that it was just as well made as it appeared on the web site and all for £235 plus delivery. It's very red and there bits that look as though they have been cut using a cold chisel but in general the quality is good. I think it's great value for money. I raised the table to its full height with no difficulty and lowered it again, it's going to be great. The removable plate at the end provides a ramp to enable the bike to be easily pushed onto the table.
So there we have it, no progress on the scooter but it's progress on the project.
Sunday, 18 July 2010
WHAT DO THE NUMBERS MEAN?
My only justification for considering having the engine rebuilt, at considerable cost, is that some of the cost will be recouped when I come to sell the scooter. Having the frame and engine numbers tie up with the log book provides authenticity and therefore enables me to command a higher price. I don't expect to recover it all but hopefully it will attract more bidders and then you never know your luck.
One of the things that attracted me to this scooter was that it had its original brown log book. I can remember when I bought my first car and how pleased I was when I was handed the "log book". Some how that made the car mine more than having the care itself. I don't know why Mark fitted an unrelated engine in the frame when he had the original. Perhaps he had the spare engine and didn't want the expense of the rebuild.
 The log book shows
It shows the model is an LDB
(by which I assume it's a series 2)
frame number to be 194077
the engine number 203897.
The registration date is 5th October 1956
These facts should tie up with the Lambretta register. I look forward to receiving my Lambretta Club membership so I can get them confirmed. In the mean time I have referred to the Lambretta Bible. Unfortunately things are not as simple as I had hoped.
The "bible" shows the following information :-
LD 150 (Mk 2)
1954: 105,001 - 105,442
1955: 105,443 - 157,721
1956: 157,722 - 158,56
LD 150 (Mk3)
1957: 200,001 - 281,871
1958: 281,872 - 312,954
Did you spot the absence of 194077?
I'm assuming that since 1957 started with 200 at the beginning of the Mk3 series, 194 would have been at the end of the Mk2 series. This of course may not be the case so I shall just have to wait until I can get it confirmed by LCGB.
At least I have confirmed that the frame and engine numbers are as shown on the log book.
Having re read this blog I'm a bit concerned that I've started to become a bit of a nerd. (definition:- foolish or contemptible person who lacks social skills or is boringly studious. OR an intelligent, single-minded expert in a particular technical discipline or profession. Your choice.)
One of the things that attracted me to this scooter was that it had its original brown log book. I can remember when I bought my first car and how pleased I was when I was handed the "log book". Some how that made the car mine more than having the care itself. I don't know why Mark fitted an unrelated engine in the frame when he had the original. Perhaps he had the spare engine and didn't want the expense of the rebuild.

It shows the model is an LDB
(by which I assume it's a series 2)
frame number to be 194077
the engine number 203897.
The registration date is 5th October 1956
These facts should tie up with the Lambretta register. I look forward to receiving my Lambretta Club membership so I can get them confirmed. In the mean time I have referred to the Lambretta Bible. Unfortunately things are not as simple as I had hoped.
The "bible" shows the following information :-
LD 150 (Mk 2)
1954: 105,001 - 105,442
1955: 105,443 - 157,721
1956: 157,722 - 158,56
LD 150 (Mk3)
1957: 200,001 - 281,871
1958: 281,872 - 312,954
Did you spot the absence of 194077?
I'm assuming that since 1957 started with 200 at the beginning of the Mk3 series, 194 would have been at the end of the Mk2 series. This of course may not be the case so I shall just have to wait until I can get it confirmed by LCGB.
At least I have confirmed that the frame and engine numbers are as shown on the log book.
Having re read this blog I'm a bit concerned that I've started to become a bit of a nerd. (definition:- foolish or contemptible person who lacks social skills or is boringly studious. OR an intelligent, single-minded expert in a particular technical discipline or profession. Your choice.)
Saturday, 17 July 2010
COMING TO TERMS WITH THINGS
Over the last few days I have been having mixed feelings. At one point I even thought of putting the bike back on Ebay because the task seemed too daunting. There are so many bits that must be found and in most cased I don't even know what they look like. My first action must be to join the Lambretta club, they must know where all the bits are. It was strange to download a form in this day and age and then to fill it in and send it off via snail mail. I look forward to seeing what they can do for me.
I started to to look round the web for possible suppliers and was cheered to find that there were quite a few. It became more difficult if you specified a 1956 LD but there were still a few. There were even bits showing up on Ebay where I had started watching bits. I was interested to see that some items were immediately re-listed if they didn't make their reserve so it's always worth looking.
 I still haven't produced my list of missing bits. Perhaps because I'm frightened how long it will be. I am beginning to settle to the idea that I am going to rebuild the original engine. It would be daft to have the paperwork that matches the frame and the engine and not to make it come true. I kid myself it will increase the value of the finished scooter should I decide to sell it at some point. To be truthful I think it will only reduce the loss. I realised that this might be costly but had no idea of just how much it was likely to be. If I was going to go down that route I needed to locate a barrel and head.
 So I plucked up courage and went in search of the two prime bits. I tried Tim's man in Derby, K & S scooters, he couldn't help but suggested I send him a list and he would see what he could do. After a couple more failed attempts to locate a barrel I got round to phoning Cambridge Lambrettas to see if they had a barrel and head and was it possible to rebuild an LD. Yes the do rebuild LDs and their labour cost is £1000 plus parts and no they didn't have any cast barrels. The guy said that they would only fit a lined aluminum barrel at an approximate cost of £300 because it was the best solution and yes they were available. He agreed with me that I was possibly looking at £1500 to get the engine unit alone up to scratch. The guy was not very encouraging and a bit off hand, take it or leave it. Not a very nice experience considering my state of mind. That still leaves the silencer and I would have to pinch the carb from the engine fitted in the bike at the moment, and that's only the start.
After a night's sleep I felt refreshed and brave enough to try again. I tried a couple of other sites only to find that the LD was too old for them to have parts. I left a request with Bike Spare Finder but to date have not had any replies. Then I struck gold. I had had two pointers to try Scooter Surgery. I liked there web site because it was friendly, not how you used it but in what it said. I may even appear a bit amateurish but I like it. I phoned and spoke to Andy who had time to talk to me and was very informative. He told me that the LD engine was very strong and used to be assembled by hand on an individual basis. This is fine but you need to be careful when stripping and rebuilding to ensure that you get it right. Apparently you have to be aware of this if you try to build one engine out of two. Of course this may have been a ruse to put me off doing the rebuild my self but I don't think so.
The man to talk to was Patch (Patrick Hood) but he was off sick with a bad back but hopefully back next week. I was told that Patch actually rides an LD to work every day. Andy suggested that I phone again next week. When pressed he thought a rebuild would usually start from £1000 depending on what was required. Seems to tie up. I have to say I would rather spend my money money with Scooter Surgery than with Cambridge Lambretta from my experience so far. Andy said if I liked to Email some pictures of the engine he would ensure that they got to Patch as soon as he returned. I put the phone done much cheered, may be it's all going to be alright after all.
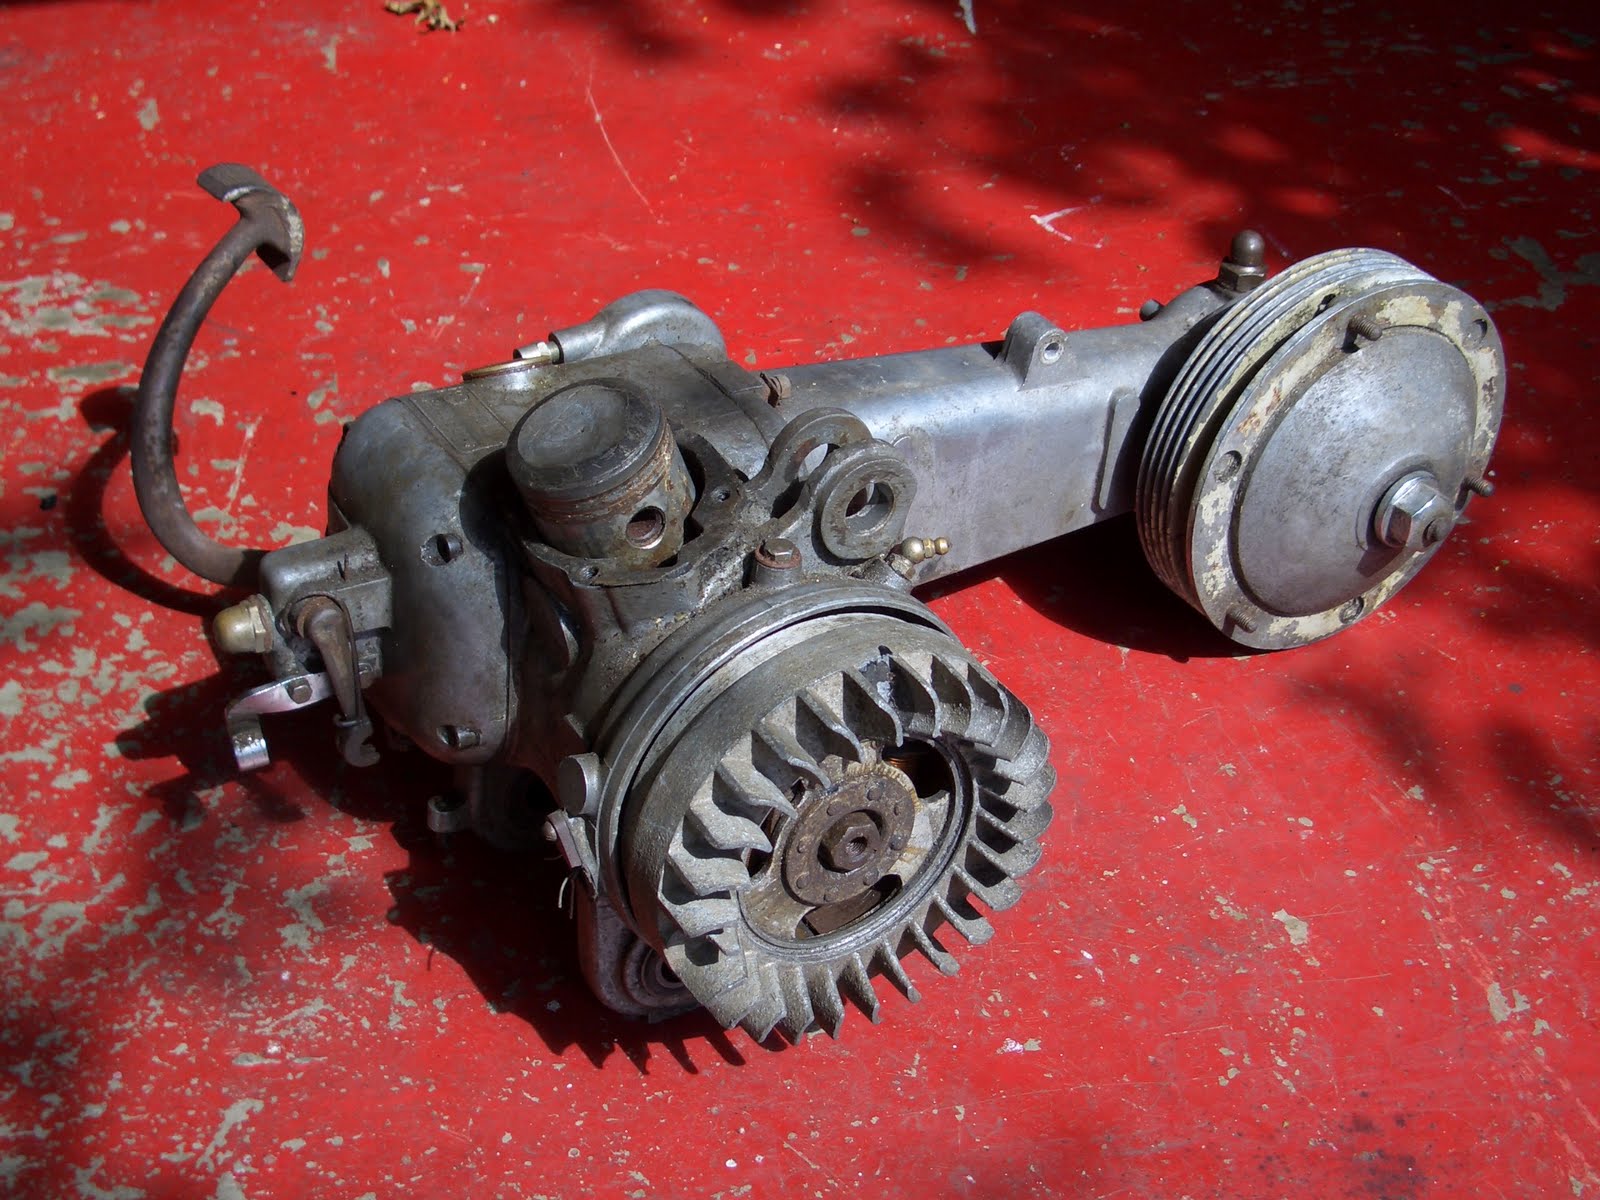
I went straight to the Project office and took a series of photographs of the original engine. This forced me to take a closer look at the condition.
 Most importantly I found the crankshaft turned easily with no grinding sounds. This doesn't mean a lot because there may damage to the surfaces that necessitates changing the crank but at least it moves. I have to say it didn't look too clean inside but it moves.
 The flywheel had been removed and was just pushed on and the key was missing. The keyways looked OK and had not been damaged as far as I could tell. The contact breaker unit was missing as was the electrical connector on the outside of the magneto casing. These are the sort of things that I worry about finding. I don't think the mag had been removed or the engine case split. Looking at the securing screws they show no signs of damage which is likely to occur when a "butcher" attempts the work.
 I tried to move the clutch lever but couldn't.
I resisted the temptation to force it because I expect the cork pads will be stuck to the plates just like Tim found on his Vespa. Read his blog - Black Spanner. I had a quick look at the gear change leaver but again it resisted my efforts. It would be daft to break something if I'm going to have it rebuilt and have to find another elusive part on top of all the others.
 The rear hub looked fine and turned easily. Again I resisted the temptation to remove the nut which secures the brake drum. I don't know it it's right or left handed, I need a handbook.
Back to the computer to prepare the pics to Email to Andy. In the end I sent him eleven. Within a very short time I had a reply form Maude, who apparently does all the office work. Just like Andy I came off the phone feeling that I had known her for ages. I loved the start of her Email which said, "Mike she looks a sweet little engine." I think she's my type of person.
I'm really looking forward to Patch's first impressions. They could be fundamental in my decision as to what to do.
I started to to look round the web for possible suppliers and was cheered to find that there were quite a few. It became more difficult if you specified a 1956 LD but there were still a few. There were even bits showing up on Ebay where I had started watching bits. I was interested to see that some items were immediately re-listed if they didn't make their reserve so it's always worth looking.
 I still haven't produced my list of missing bits. Perhaps because I'm frightened how long it will be. I am beginning to settle to the idea that I am going to rebuild the original engine. It would be daft to have the paperwork that matches the frame and the engine and not to make it come true. I kid myself it will increase the value of the finished scooter should I decide to sell it at some point. To be truthful I think it will only reduce the loss. I realised that this might be costly but had no idea of just how much it was likely to be. If I was going to go down that route I needed to locate a barrel and head.
After a night's sleep I felt refreshed and brave enough to try again. I tried a couple of other sites only to find that the LD was too old for them to have parts. I left a request with Bike Spare Finder but to date have not had any replies. Then I struck gold. I had had two pointers to try Scooter Surgery. I liked there web site because it was friendly, not how you used it but in what it said. I may even appear a bit amateurish but I like it. I phoned and spoke to Andy who had time to talk to me and was very informative. He told me that the LD engine was very strong and used to be assembled by hand on an individual basis. This is fine but you need to be careful when stripping and rebuilding to ensure that you get it right. Apparently you have to be aware of this if you try to build one engine out of two. Of course this may have been a ruse to put me off doing the rebuild my self but I don't think so.
The man to talk to was Patch (Patrick Hood) but he was off sick with a bad back but hopefully back next week. I was told that Patch actually rides an LD to work every day. Andy suggested that I phone again next week. When pressed he thought a rebuild would usually start from £1000 depending on what was required. Seems to tie up. I have to say I would rather spend my money money with Scooter Surgery than with Cambridge Lambretta from my experience so far. Andy said if I liked to Email some pictures of the engine he would ensure that they got to Patch as soon as he returned. I put the phone done much cheered, may be it's all going to be alright after all.
I went straight to the Project office and took a series of photographs of the original engine. This forced me to take a closer look at the condition.
 Most importantly I found the crankshaft turned easily with no grinding sounds. This doesn't mean a lot because there may damage to the surfaces that necessitates changing the crank but at least it moves. I have to say it didn't look too clean inside but it moves.
 I tried to move the clutch lever but couldn't.
 I resisted the temptation to force it because I expect the cork pads will be stuck to the plates just like Tim found on his Vespa. Read his blog - Black Spanner. I had a quick look at the gear change leaver but again it resisted my efforts. It would be daft to break something if I'm going to have it rebuilt and have to find another elusive part on top of all the others.

Back to the computer to prepare the pics to Email to Andy. In the end I sent him eleven. Within a very short time I had a reply form Maude, who apparently does all the office work. Just like Andy I came off the phone feeling that I had known her for ages. I loved the start of her Email which said, "Mike she looks a sweet little engine." I think she's my type of person.
I'm really looking forward to Patch's first impressions. They could be fundamental in my decision as to what to do.
Subscribe to:
Posts (Atom)